• Mite Calculator
  • Bee Yard Blog
  • Wildflower Bloom Calendar
  • Honey For Sale
  • Contact
Menu

MiteCalculator.com

Street Address
City, State, Zip
Phone Number

Your Custom Text Here

MiteCalculator.com

  • Mite Calculator
  • Bee Yard Blog
  • Wildflower Bloom Calendar
  • Honey For Sale
  • Contact

Best Gifts for Beekeepers, 2021

December 5, 2021 Eric Miller

It’s getting harder to make this list each year, because I’ve already covered a lot of my favorites in 2018, 2019, and 2020. I’m trying to think outside-the-box for new gift ideas, which means there’s a good chance the beekeeper you’re buying for doesn’t already have these items. But be sure to check out those previous posts for more ideas.

Before jumping in, know that I am not affiliated with any of these companies or products. I include links so it’s easy for you to find and buy them if you choose, but I don’t make a penny from any purchases. Each item here is included because I like it, not because I’m shilling products.

Top Pick, Under $10

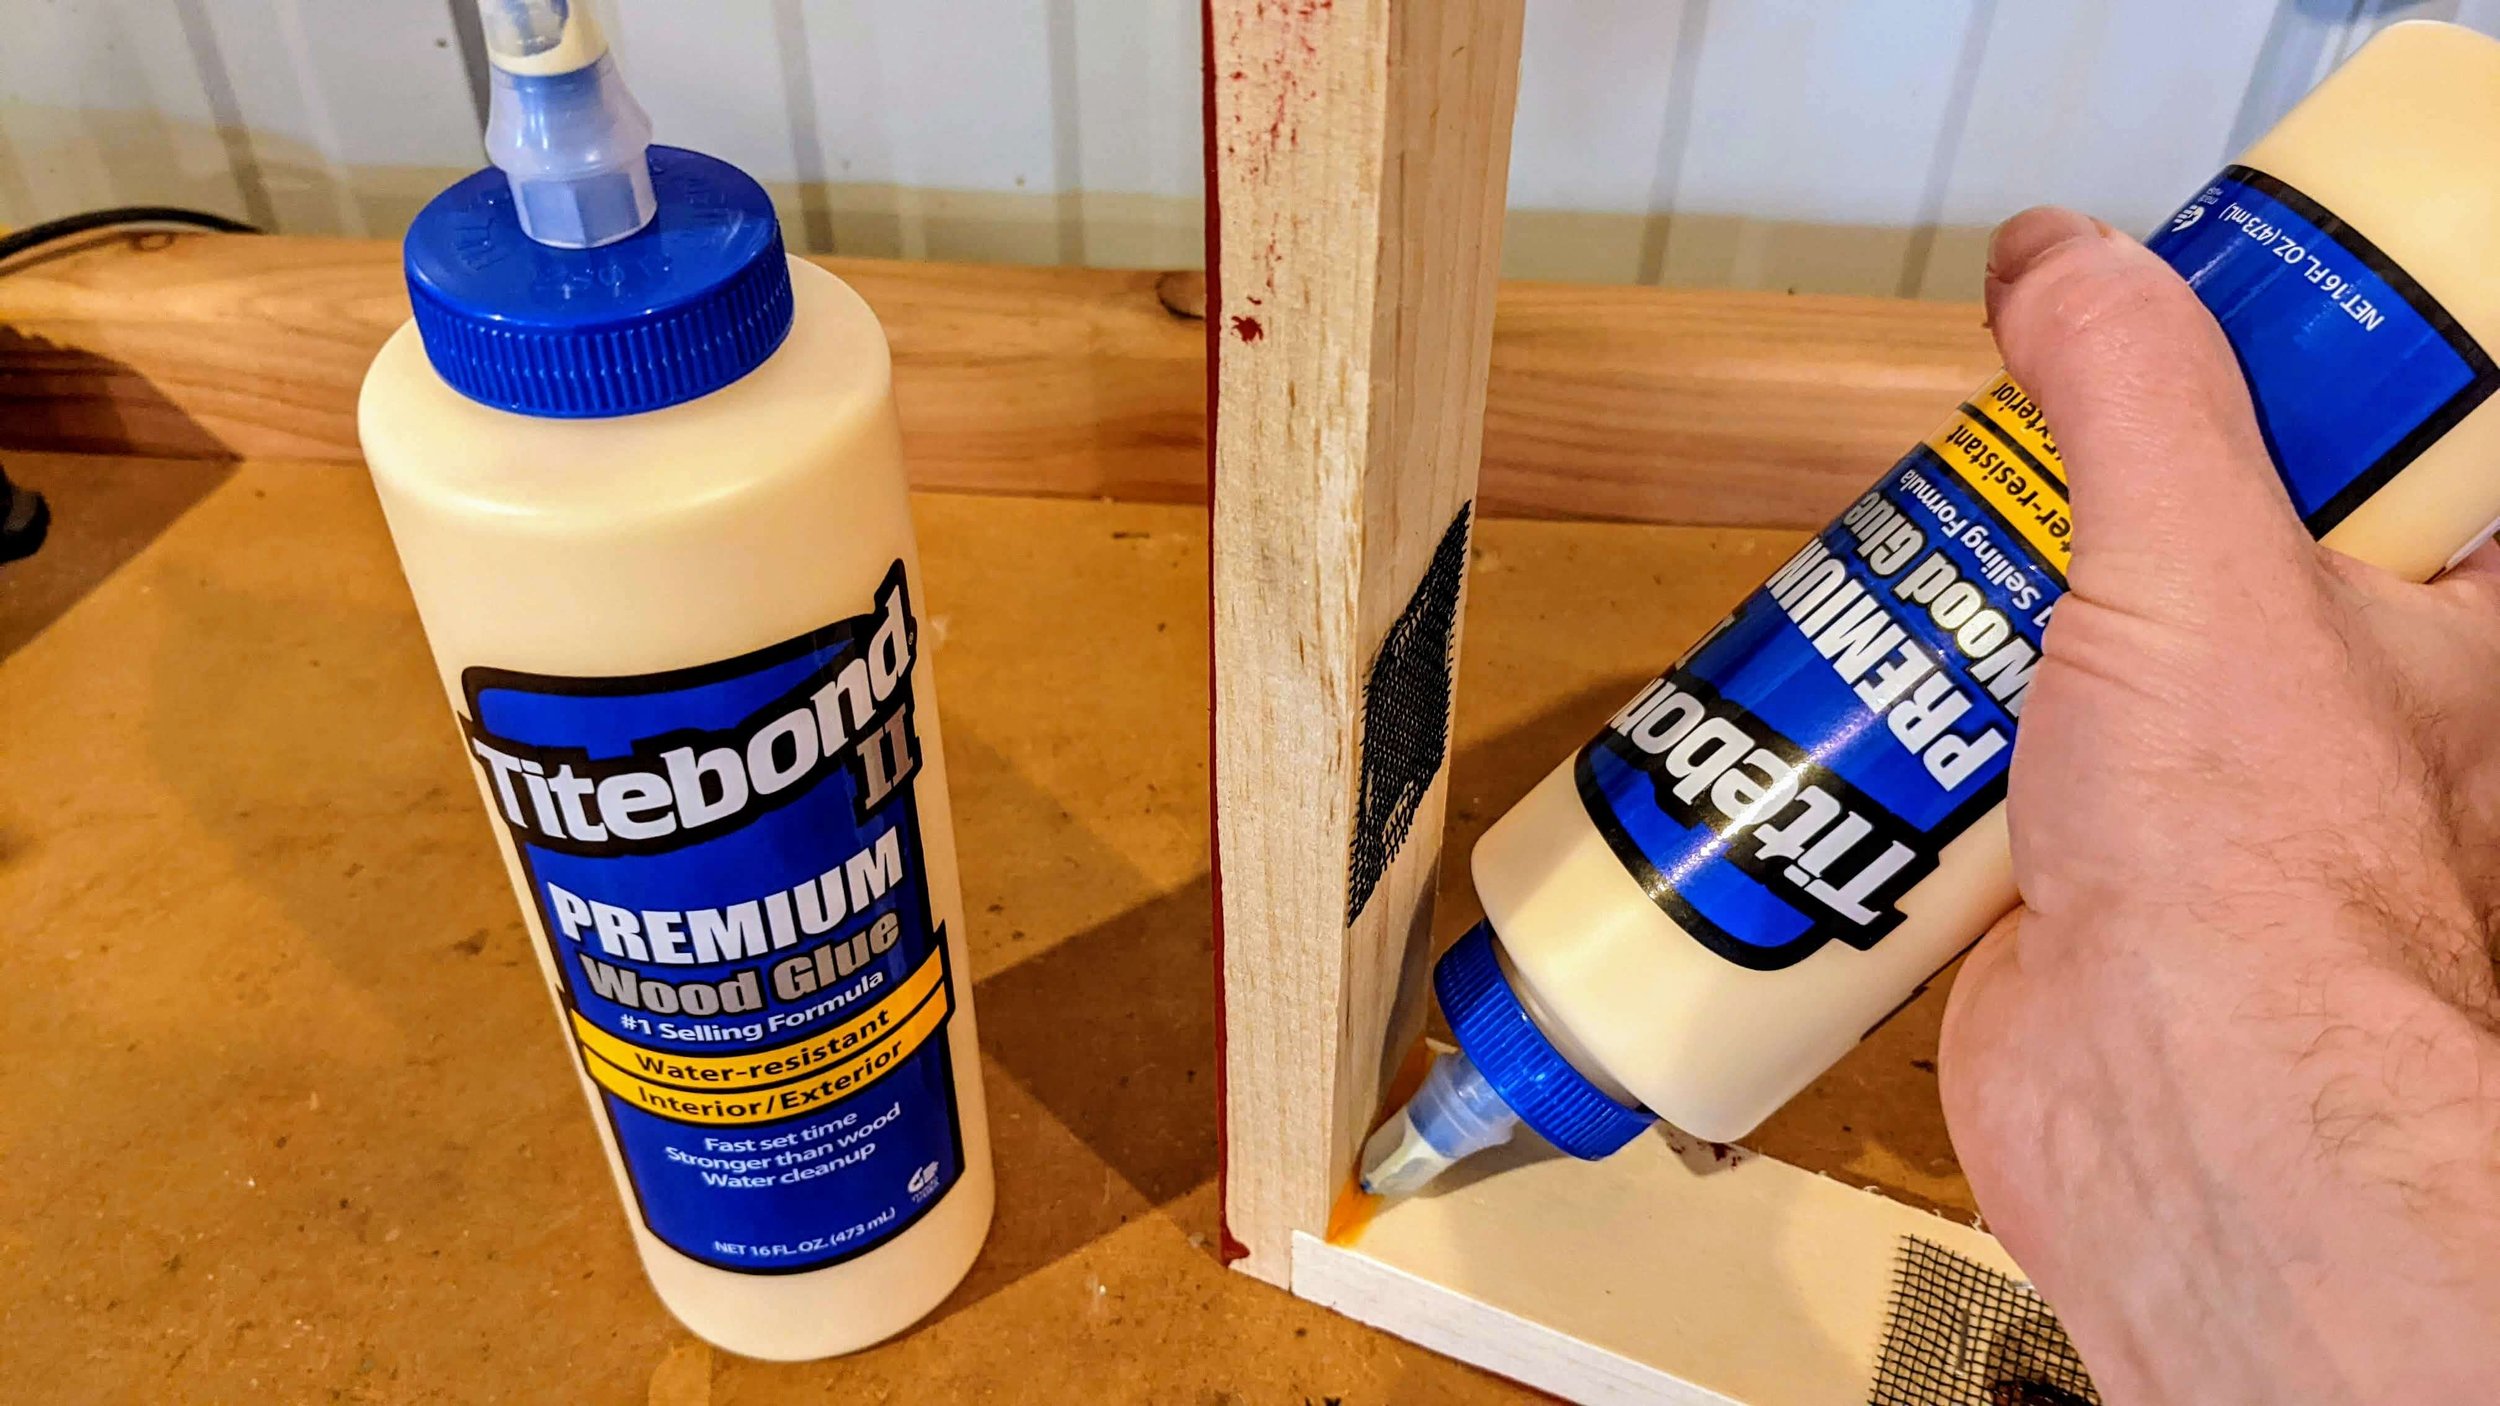
Wood glue is great for hive assembly and also for reducing small hive beetle infestations

Wood Glue

Wood glue is an unsung hero of beekeeping. We use copious amounts of the stuff when we’re assembling hive components, which helps keep boxes and frames strong enough to handle the abuse we inflict on them. A lesser known, but as important, use for wood glue is sealing any gaps and crevices in hive equipment. By filling these cracks, we limit hiding spots and egg nurseries for the dreaded small hive beetle. I apply wood glue to every piece of woodenware prior to using it, which has almost eradicated small hive beetles in my hives. You can pick up high-quality Titebond wood glue at any local hardware store for under $10.

Top Pick, $10-$20

This American-made garden trowel has stood up to serious abuse on our rocky property

Garden Trowel

Sooner or later, most beekeepers turn into gardeners. That’s because it becomes super obvious how connected honey bees are to the plants around them. When I started getting into native plantings for my bees, one of the tools that kept failing was the humble garden trowel. The problem is the handles on cheap trowels at big box stores eventually separate themselves from the scooper. So I found this trowel by Wilcox. It’s made in Iowa, and can be had for as little as $18.99 on Amazon. This trowel has been indestructible for us, even with all the abuse from our rocky clay soil. And it’s an important tool in our quest to grow as many pollinator-friendly plants as possible.

Top Picks, $20-$50

A “flower pot” swarm trap mounted in a tree near my bee yard

Swarm Trap

Every beekeeper should have at least one or two swarm traps. As soon as we see signs our bees are preparing to swarm (which they try to do just about every spring), we almost have a civic duty to put out traps in order to minimize the risk of our bees swarming into the neighbors’ houses. Besides that responsibility, beekeepers can reduce costs by capturing bees instead of buying bees. My favorite type of swarm trap is the “flower pot,” which is basically waxed paper machete in the shape of a pot. These are really cheap, reusable, and lightweight. The weight is my favorite thing about them, because lugging a heavy wooden swarm trap up a tree is no fun. And it’s even less fun lugging it back down with a swarm of bees inside. Mann Lake sells these swarm traps for $31.95 each, and for my money they’re a must-have.

This old Brushy Mountain frame jig is like having an extra set of hands for assembling bee frames

Frame Jig

Every beekeeper should assemble their own frames at once in a while. I don’t have a problem with buying frames pre-assembled, but every now and then I need frames fast, and the only ones available at my local bee store are unassembled. Assembling these frames can be tedious, messy, and time-consuming. You end up trying to hold every piece of wood in position while driving a nail through them with your glue-covered hands. But a frame jig makes the process a thousand times better, to the point that I actually find it meditative. A honey bee frame is made up of at least four wooden pieces that have to be nailed and glued together, all while keeping them at right angles. A frame jig holds these pieces in place so you can do 10 frames at a time, much quicker and at a higher quality (i.e. not crooked) than doing it freehand. My frame jig came from Brushy Mountain, which isn’t in business anymore. But it looks like at least one company (Texas Bee Supply) is making a similar design, and offering it for a surprisingly low price of $35.59 plus shipping.

Top Pick, $50-$100

I write “Honey” on my food-grade buckets so I know these are only to be used for storing honey

Honey Buckets

“You got me buckets for Christmas?” is a question none of us wants to hear. But the truth is beekeepers need buckets. And not just any buckets. They need clean, food-grade buckets for extracting and storing honey. They also need them for mixing syrup to feed their bees, assuming they’ve got more than a few hives. Buckets around me tend to get repurposed for any number of property and home maintenance uses—some of which involve chemicals that make them off-limits for beekeeping. So I’ve got a good set of BPA-free food-grade buckets I set aside for beekeeping use only. These run $69.99 on Amazon for a set of six, which is enough for most hobby beekeepers. If you want to make them more of a unique gift, customize them by painting or stenciling some honey bees on them, or even the beekeeper’s business name. That’ll help keep the buckets from being used to wash their car, and honestly would make a great, thoughtful gift.

Why I Like Seeing Mites in My Hives

September 26, 2021 Eric Miller
PXL_20210919_182626730.jpg

Varroa mites are bad for honey bees, there’s no doubt about it. The mites harm our bees by feeding on their fat bodies and spreading viruses, and as far as I’m concerned are responsible for a vast majority of “mystery” colony losses. Despite this, I don’t mind when I find mites in my hives. In fact, I start to get worried when I don’t. So why this apparent contradiction?

Years of monitoring mites has taught me that my strongest colonies have the heaviest mite loads, and therefore need the most intervention. This seems like a no-brainer—of course a colony bursting at the seams with brood will have more mites than one that’s struggling to build population. Capped brood cells are nurseries for mites, after all. As obvious as this should be, I’ve heard and read many accounts from beekeepers confounded by the loss of their strongest hive, based on the flawed assumption that a strong colony should somehow be able to fight off the invading varroa. In reality, there’s a direct correlation between colony strength and mite pressure.

So this time of year—late summer through early fall—I’m routinely testing hives for mite levels. I get a bit alarmed if I see levels up over 3-4%, and I make those hives priority for treatments. But I get far more nervous if I see a hive that registers 0%. Those hives also get priority—not for treatment, but for checking the status of their queens. Sometimes it just means the queen has stopped laying due to the nectar dearth, which happens. But usually there’s enough residual brood during those dearths to harbor at least some mites, so more often finding zero mites is a sign the hive has gone queenless.

A lack of mites in this hive was a warning sign

A lack of mites in this hive was a warning sign

The graph above (full resolution) is from a colony I lost recently. The chart shows the measured mite levels over the last couple years, and everything looked great until it took multiple attempts to successfully requeen after a split in April. But it provides a good comparison of mite levels in a healthy queenright hive versus a struggling hive. In 2019 and 2020 when this hive was doing well, you can see the mite levels were up between 1-2% during the late summer and fall when I was actively managing mites in the bee yard. My late winter tests showed almost no mites in the hive, which is also normal for a colony that has been mostly broodless for months.

Counting mites after an OAV treatment

Counting mites after an OAV treatment

But my split in April ultimately doomed the colony. It finally raised a laying queen by late July, but the population had dropped so low they were in danger of being overwhelmed by neighboring bees. I tightened up the entrance to give them a chance, but after getting two consecutive 0% mite tests, I went back into confirm what I already suspected—they had been robbed out, the queen was dead, and only a handful of workers remained. This late in the year, attempting to requeen a colony and get it through the coming winter can be a futile effort, so my solution is usually to cut my losses and do a newspaper combine with a queenright colony. At least this gives the remaining workers a place to contribute and live out their lives in relative comfort.

If the colony hadn’t been decimated by the extended period of queenlessness, the mite levels would’ve spiked in August and September, the same as they did the previous two years. On paper the mite load in this hive looked great this summer. One way to (mis-)interpret the mite tests would be to say “Hey, my bees are mite resistant!” But much like Goldilocks’ porridge, finding too few mites can be as bad—or even worse—than finding too many mites. So outside of Australia and the couple other places on earth still without Varroa destructor, it’s not so bad to find mites in your hives. Just don’t ignore them when you do.

How to Extract Honey

July 31, 2021 Eric Miller
210731_Honey_Extraction_Setup.jpg

There are a zillion articles and videos online demonstrating techniques for uncapping, extracting, and bottling honey. These are important skills for a new beekeeper to learn, but they often don’t address the process itself. So that’s what I’ll try to do here. Bear in mind this process will vary from beekeeper-to-beekeeper, based on the number of hives, space available, and frankly the amount of money they’re willing to sink into their operation. For reference, I maintain about 20 hives and bottle about 1,000 pounds of honey. Despite being a hobby beekeeper, I like to try and turn a little profit each year, so I’ve avoided expensive tools in order to try and meet that goal. Admittedly, every year I gripe about needing a bigger extractor, but every year I seem to get by with my cheap little two-framer.

A couple jars of chunk honey—one filled and one empty

A couple jars of chunk honey—one filled and one empty

When we built our house several years ago, I purposefully designed part of the basement with the honey harvest in mind. On one end, I left an 11-by-28 foot space (308 sq ft) in bare concrete with a floor drain. For 11 months of the year, this makes for a tidy utility area, where we don’t have to worry about an unexpected leak from our washer or water heater. But for one month a year, it becomes my honey house.

This deep freeze is dedicated to beekeeping use, and holds seven full honey supers at a time

This deep freeze is dedicated to beekeeping use, and holds seven full honey supers at a time

The chart above (full resolution) shows my setup once I’ve transformed the space for honey operations. It looks complicated, because it kinda is. Now, if you’re just taking a few frames for personal consumption or for gifting to friends and neighbors, this is overkill and unnecessary. For you, crush -and-strain on the kitchen table might be more appropriate. But once you’re trying to safely, cleanly, efficiently extract several hundred or a few thousand pounds of honey, the kitchen table will feel inadequate (and may upset the people you live with).

In the diagram you can see I’ve got frames moving to-and-from various stations. All of them ultimately find their way into a honey jar, but some have different paths depending on various factors.


Here are the steps that correspond to the diagram, in broad strokes:

1 - Seven medium honey supers are pulled from hives and placed in deep freeze for at least three days. This ensures there are no hive beetle or wax moth issues.

1.1 - If the tent is full and you need to put another batch in the freezer, the supers move to holding position with fan blowing into their top. As I’ve discussed in the past, honey is hygroscopic so you don’t want it sitting there absorbing humidity before it gets bottled.

2 - Supers move into warming tent for at least a couple days. Extraction is far easier and more efficient when frames are warm.

2.1 - Frames with uncapped cells are segregated while pulling frames for extraction.

2.2 - Frames with uncapped cells need to be extracted separately to ensure they are sufficiently dry. If they are not, they are fed back to the bees.

2.3 - Lightly colored frames of honey are segregated in order to offer both dark and light honey to customers. If most of this year’s honey is light, then this would be used to segregate darkly colored frames.

2.4 - Color-segregated honey moves back into tent to warm prior to extraction.

2.5 - Foundationless/comb honey is segregated to avoid accidentally putting it into the extractor. It’s important to write “comb” or “foundationless” on these frames before you put them into hives for easy spotting. (Skip to step 6.1 for these frames.)

3 - Frames are uncapped with the pin roller. Uncap them as well as possible the first time to avoid repeatedly having to move them in and out of the extractor.

4 - Frames are moved into the extractor, spun on each side, examined for capped cells, uncapped again if necessary, re-spun if necessary, and then placed into the Hive Butler for moving outside.

5 - After every 10 frames, honey in the extractor is emptied into a holding bucket.

6 - Once all available frames are extracted or all honey buckets are full, empty honey buckets into bottling tank and begin filling jars. (NOTE: Be sure to allow honey to settle for at least a day in the honey buckets so air bubbles created during extraction can be skimmed from the top of the honey.) This is also when you test the moisture of each bucket to ensure it’s adequately dry.

6.1 - Cut rectangles of comb honey and place it into empty wide-mouth jars. Fill jars with light honey, if available, so the comb can be easily seen by the customer.

7 - Move filled jars into storage area. These still need to be labeled and sealed prior to delivery.

NOT COVERED HERE - Creamed honey requires extra steps of blending seed jars into buckets, filling jars, and rotating them through the wine chiller at 55-57 degrees for a couple weeks.


This is not a one-size-fits-all plan. But I hope it gets you thinking about designing your own extraction layout based on your personal situation. That could be anywhere from using a bread knife in your kitchen to building a stand-alone honey house with automated equipment.

A Note About Cleanliness

A frame of summer honey about to burst at the seams

A frame of summer honey about to burst at the seams

While the focus of this has been process, I should note that your number one responsibility to your customers when extracting honey is cleanliness. I’ve simply seen too many beekeepers dripping sweat into their honey during the hard work of extracting. That kind of disregard for the customer, or a “what they don’t know won’t hurt them” attitude can ruin your reputation, and also the reputations of all beekeepers.

One reason I like my basement layout is because I can keep it nice and cool to avoid perspiring, and at the same time keep my supers in a warm tent so they extract well. When I’m pulling supers off the hives, I wear a bandana under my veil to catch any sweat (and replace it often). The entire workspace shown above gets covered in plastic to help keep both the basement and the harvest equipment as clean as possible. For plastic covering, I’ve found clear shower curtains are great—they’re much more durable than painter’s plastic, they’re easy to clean between extraction sessions, and they can go into your washing machine for use year-after-year. Also, in my own design I’ve got a basin sink right next to where I’m standing most of the time. Having a sink or some other way to frequently clean your tools and hands (which I keep gloved) might be the most important feature of my whole layout, and it keeps me from getting bogged down in stickiness.

The honey harvest is HARD work. But it should be something we enjoy, not dread. Developing a system can take some of the mayhem out of it, and might even make it a meditative process you look forward to each summer.

Knowing When to Pull Honey Supers

June 13, 2021 Eric Miller
full_super.jpg

When should I remove honey from my hives? Beekeepers ponder this question every year. By mid-June, we’ve gotten through the primary swarm season—to me the most mentally challenging part of the beekeeping season—and we’re deep into the main flow. At this point, I’m monitoring the flow and thinking about the next major step: harvest. Below I’ll share six things to consider when deciding whether or not it’s time to pull honey supers for extraction.

1. Hive Weight

This readout from a Broodminder scale indicates the honey flow is still going strong

This readout from a Broodminder scale indicates the honey flow is still going strong

If you pull honey supers before the flow ends, you can miss out on a lot of incoming nectar. (Assuming you don’t replace the supers with empty ones, which I’ll discuss more below.) If you wait too long after the flow ends, the bees can start eating up your harvest. So I like to wait until just after the end of the main honey flow, and then pull supers. And the best way to know when that flow ends is to use hive scales. I’ve recommended the Broodminder hive scale in the past, but any way to monitor the weight of a hive works. The key isn’t so much knowing the exact weight of your hives, but rather watching the changes in weight. If hives are getting heavier, the flow is still on. If hive weights level off for a week or two, the flow is mostly off—this is when I start pulling supers. If hive weights start dropping, the bees are eating through surplus honey. If you prefer to avoid gadgets, the age-old technique of “hefting” hives is an option, but I for one can’t remember how heavy all my hives felt from week-to-week, so I highly recommend investing in at least one hive scale for each bee yard.

2. Visual Cues

Brand new comb drawn in this foundationless frame tells me there’s still a lot of nectar coming into the hives

Brand new comb drawn in this foundationless frame tells me there’s still a lot of nectar coming into the hives

Another good way to decide if the time is right for extraction is to look for signs of expansion in your hives. Do you see a lot of new, white honeycomb being drawn each week? Is it being filled with nectar? If the answer to those questions is Yes, there’s still a lot of nectar available to your bees. Once all that comb building and filling stops or significantly slows down, then it’s probably time to start extracting.

3. Flowers in Bloom Near You

Lots of blooming clover means lots of quality nectar

Lots of blooming clover means lots of quality nectar

I’m an advocate for tracking bloom times in your area. I’ve even got a page showing some common bee forage bloom times here in the Midwest. Once you start to understand the wildflower blooms in your area, it can be a great help in deciding when to put on, or remove, honey supers. Let’s say the hive weight leveled off and you’re thinking about starting your extraction. But then you look at your local bloom schedule and see that a couple major honey-producing plants will bloom soon. If that’s the case, you might want to give the bees a chance to make more honey from those flowers.

Looking ahead, I see good potential for incoming nectar in the next two weeks

Looking ahead, I see good potential for incoming nectar in the next two weeks

As I write this, it’s June 13th. I can look at my spreadsheet of local wildflowers and anticipate the flow will continue or even improve in the next couple weeks, because major nectar sources like mountain mint are about to bloom. This kind of “intel” is invaluable when it comes to making decisions in the bee yard.

Mountain mint will start blooming here next week, so I’m in no hurry to remove supers now

Mountain mint will start blooming here next week, so there’s no way I’ll remove my honey supers now

If you do multiple extractions each year, this might not matter so much because you replace full supers with empty ones ready for filling. I personally prefer to do a single extraction each year at the end of the main honey flow. This takes me multiple weeks, so every super doesn’t come off the hives at the same time; but once I decide to start pulling supers, I don’t generally add more. This is just personal preference, because I don’t want my basement to be a honey factory for half the year. So I divide local wildflowers between the main spring/summer flow and the secondary fall flow. I keep the honey from the summer flow, and my bees keep the honey from the fall flow.

4. Providing Ample Winter Stores for Your Bees

My bees go crazy for goldenrod in the fall, and I let them keep that honey to use in the winter

My bees go crazy for goldenrod in the fall, and I let them keep that honey to use in the winter

Don’t take all your bees’ honey. After all, they collected it for a reason—they need plenty of food to survive the coming winter. As mentioned above, I leave any fall honey (mostly aster and goldenrod) for my bees, and only do a single extraction of spring/summer honey each year. But even then, I won’t take an ounce of honey from colonies that seem light on resources. I’d much rather leave extractable honey in the hives than replace those bees next spring. It’s just not worth it. Each year I have hives that produce zero surplus honey for one reason or another, and that’s okay. Just expect it.

5. Processing Equipment/Facilities

My deep freeze holds a little over seven supers’ worth of honey, so that’s how many I pull during each trip to the bee yard

My deep freeze holds a little over seven supers’ worth of honey, so that’s how many I pull during each trip to the bee yard

My capacity for processing honey supers is limited. Everyone’s is, really. Understanding your own limitations can inform you on when you need to extract. One major limitation I have is my deep freeze—I like to cycle every frame of honey through the freezer for a few days to ensure I don’t have wax moth or hive beetle larvae that could cause problems later. My freezer holds seven honey supers, so I plan my harvests to pull seven supers at a time. Once those get three days in the freezer, I can store them inside and go pull another seven supers. Maybe you extract in tiny shed, or maybe you’ve got a commercial processing facility. Either situation affects how many honey supers you can handle at a given time, and you'll need to plan accordingly.

6. Market Demand

payment.jpg

This is the least important factor for me. Don’t get me wrong, I greatly appreciate the good people who buy my honey. I love getting to interact with them each fall and winter, when I do most of my selling. But my honey is not a commodity product, it’s a luxury product. It’s in scarce supply and it’s only seasonally available. By July, I’m getting quite a few messages asking if I’ve got honey for sale yet. I don’t let that dictate my harvest, but it admittedly injects a sense of urgency in my processing pace. I’m thankful to have buyers willing to wait until late in the year for my honey, but if you’ve got people demanding honey in May, you may find yourself needing to pull supers mid-season to satisfy that demand.


Your exact situation is not the same as mine. As anyone’s, really. But hopefully these general tips help inform your decision on when the time is right to start pulling supers. Happy harvesting.

Improving the Odds of Winter Survival

April 11, 2021 Eric Miller
Hives_in_Winter.jpg

My hives make it to spring. Most of the time anyway. In the years I’ve been keeping bees, the overwinter loss rate has averaged 24% here in Missouri, while my own loss rate has been just 4%. So in my apiary, a queenright hive in October will almost certainly still be queenright the next April. I’m not sure how much credit I deserve for this—all of my colonies are descendant from a single Carniolan nuc I bought about 10 years ago, so maybe I just hit the genetic jackpot. But assuming I have at least something to do with the overwinter success of my bees, what’s the reason?

Mite management is at the top of my list. Every year I have a plan to manage mites, with the goal of ensuring each hive can raise winter bees in a relatively mite- and virus-free environment. A surprising number of beekeepers still don’t attempt to control mites, or if they do, it consists of a single application of oxalic acid or chemical strips in the fall after much of the damage has been done. Still, heavy losses are often chalked up to non-mite causes, usually the weather. Or a mouse getting into the hive, or small hive beetles, or wax moths. And on the web these ideas are constantly reinforced by other beekeepers who use the same excuses for their high losses. The unfortunate consequence is that those beekeepers are way more likely to repeat the same mistakes over and over again.

Mid-winter check of the in-hive fondant

Mid-winter check of the in-hive fondant

Good winter prep is the other thing I consider important to honey bee survival. That means being conservative with the honey harvest (even if you have to leave money on the table), feeding weak colonies through the fall, setting up hives to reduce drafts and condensation, providing dry feed during the cold months, and then jumping right back in as winter starts to wane (the beekeeping season begins well before the honey flow).

All of this requires a lot of hard physical work. Most people envision beekeeping as a leisurely hobby, where you get dressed up in a funny costume a couple times a year, enjoy a never-ending supply of fresh honey, and humble brag about taking the occasional sting to “save the bees.” I suspect many losses each winter can be traced back to beekeepers who never adjust to the harsh realities of beekeeping, which is more elbow grease and math than almost any of us expected when we put together our first hive.

To be sure, I’ve seen diligent beekeepers lose hives despite extensive mite management and careful planning—most notably The Duvall Beekeeper, who’s pushed the limits of Excel to try and understand the reason for his losses. A lack of thoughtful effort isn’t to blame in his case; others I’m sure are in the same boat.

Late-winter pollen feeding

Late-winter pollen feeding

And sometimes I fail to live up to my own standards. The hive I lost this winter was queenless after swarming last spring, and I finally got it queenright in September. It was too late to build up a population of winter bees, so it didn’t make it. Totally my fault. In my own journal I wrote that it had a low chance of survival, but instead of just combining it with another hive I rolled the dice. And lost. Hopefully that’s a lesson learned.

Regardless of how many lessons I learn and how much I try to be a good beekeeper, I never feel like I’ve done enough to prepare my bees for the winter. I always feel like I’m forgetting something or that I could’ve done more—certain most of my colonies will die before spring. This may be a healthy paranoia in the same way that parents who worry about their kids are probably good parents. If you care enough to second-guess your decisions, then you’ve likely done a pretty decent job and your bees stand a good chance of beating the averages.

Older Posts →

Previous Posts

  • 2023
    • Dec 24, 2023 Should I Wrap My Hives for Winter?
    • Jan 2, 2023 Can Hobby Beekeepers Make Money?
  • 2022
    • Jun 18, 2022 The Impossible Task of Putting on Gloves with Sweaty Hands
    • Apr 17, 2022 Habitat, Habitat, Habitat
  • 2021
    • Dec 5, 2021 Best Gifts for Beekeepers, 2021
    • Sep 26, 2021 Why I Like Seeing Mites in My Hives
    • Jul 31, 2021 How to Extract Honey
    • Jun 13, 2021 Knowing When to Pull Honey Supers
    • Apr 11, 2021 Improving the Odds of Winter Survival
    • Mar 13, 2021 Oxalic Acid Approved for Use With Honey Supers
    • Jan 23, 2021 Your Beekeeping Calendar
  • 2020
    • Nov 21, 2020 Creating a Native Flower Garden
    • Oct 17, 2020 Best Gifts for Beekeepers, 2020
    • Aug 29, 2020 Beekeeping as a Gateway to Conservationism
    • Jun 13, 2020 Moving a Swarm into a Nearby Hive
    • May 3, 2020 Easy Solar Wax Melter
    • Apr 30, 2020 Invasion of the Asian Giant Hornet
    • Mar 18, 2020 A Quarantined Beekeeper
    • Feb 2, 2020 Skunk Fence
  • 2019
    • Dec 16, 2019 Easy Honey Bee Feeding Stations
    • Nov 17, 2019 Is Honey Vegan?
    • Nov 2, 2019 Best Gifts for Beekeepers, 2019
    • Oct 11, 2019 Mite Bomb!
    • Aug 11, 2019 Beekeeping is Backbreaking Work
    • Jun 15, 2019 Tracking Bloom Dates for Better Beekeeping
    • May 24, 2019 How Many Bee Stings Would it Take to Kill You?
    • Apr 26, 2019 Painted Hive Bricks
    • Mar 23, 2019 Swarm Traps Deployed
    • Feb 18, 2019 If Honey Were Firewood
    • Feb 2, 2019 Migrants: Honey Bees in the Almond Trees
    • Jan 5, 2019 Making Beeswax Candles
  • 2018
    • Nov 30, 2018 Best Gifts for Beekeepers, 2018
    • Nov 12, 2018 Keeping Entrances Free of Snow
    • Oct 20, 2018 Controlling Hive Moisture in the Winter
    • Sep 29, 2018 Goldenrod: Flower of Last Resort?
    • Aug 18, 2018 Are Wild Bees Healthier Than Kept Bees?
    • Jul 21, 2018 Honey is Thirsty
    • Jul 4, 2018 How to Split a Hive (Or Raise a Queen in a Queenless Colony)
    • May 31, 2018 The Sweetest of Clovers
    • May 17, 2018 How to Spot a Honey Flow
    • May 5, 2018 Having a Plan
    • Apr 28, 2018 Deep Deep vs Deep Medium
    • Apr 21, 2018 Specialists
    • Apr 5, 2018 Red Handed
    • Mar 24, 2018 How Bees Fly in Cold Weather
    • Mar 13, 2018 Survivor
    • Mar 2, 2018 Bee Smart Feeder
    • Feb 20, 2018 Catching Bees with a Swarm Trap
    • Feb 18, 2018 Skunk at the Bee Hive
    • Jan 27, 2018 Diagnosing a Winter Dead Out
    • Jan 21, 2018 Horrible Decision Yields Horrible Results
    • Jan 11, 2018 Rotten
    • Jan 11, 2018 Alive
  • 2017
    • Dec 29, 2017 Making Mead
    • Dec 26, 2017 First Test of My Bee Hive Snow Visors
    • Dec 22, 2017 Uh Oh...
    • Dec 15, 2017 A Rafter of Turkeys
    • Dec 8, 2017 Cold Fondant
    • Dec 1, 2017 Bee Paralysis Virus and What I'm Doing About It
    • Nov 25, 2017 Bees in a Construction Zone
    • Nov 18, 2017 Trees for Bees
    • Nov 13, 2017 Butt in the Air, Beekeeper Beware
    • Nov 8, 2017 We Like Our Animals Furry
    • Nov 7, 2017 Total Mite Load Recalculation
    • Nov 7, 2017 Supplemental Feeding
    • Nov 7, 2017 Counting Mite Falls
    • Nov 7, 2017 MiteCalculator.com Featured on Popular Beekeeping Podcast
    • Nov 7, 2017 Winterizing With Snow Visors
    • Nov 7, 2017 Two-Wheeled Honey Deliveries
    • Nov 7, 2017 Bees and Water
    • Nov 7, 2017 Storing Used Frames
    • Nov 7, 2017 Bees Working Cosmos Flowers

POWERED BY SQUARESPACE